

When you trade futures, do you often get the direction right but still get swept out of your position first and lose money for no obvious reason? This article won't teach you how to time your entry. Instead, it first walks you through why futures lose money more easily than spot, then breaks down what each of the 5 metrics — funding rate, liquidation price, leverage, margin mode, and open interest — is really telling you, and finally gives you a pre-entry risk check so your own position stops burning you.
First, Get This Straight — Why Do Futures Lose Money More Easily Than Spot?
"Isn't it just betting up or down? How different can futures be from spot?" Very different. Futures come with leverage, liquidation, and a funding rate you have to pay, and once these stack up, the risk is nowhere near the same magnitude as spot.Build this understanding first, and you'll see why those 5 metrics are non-negotiable to watch.
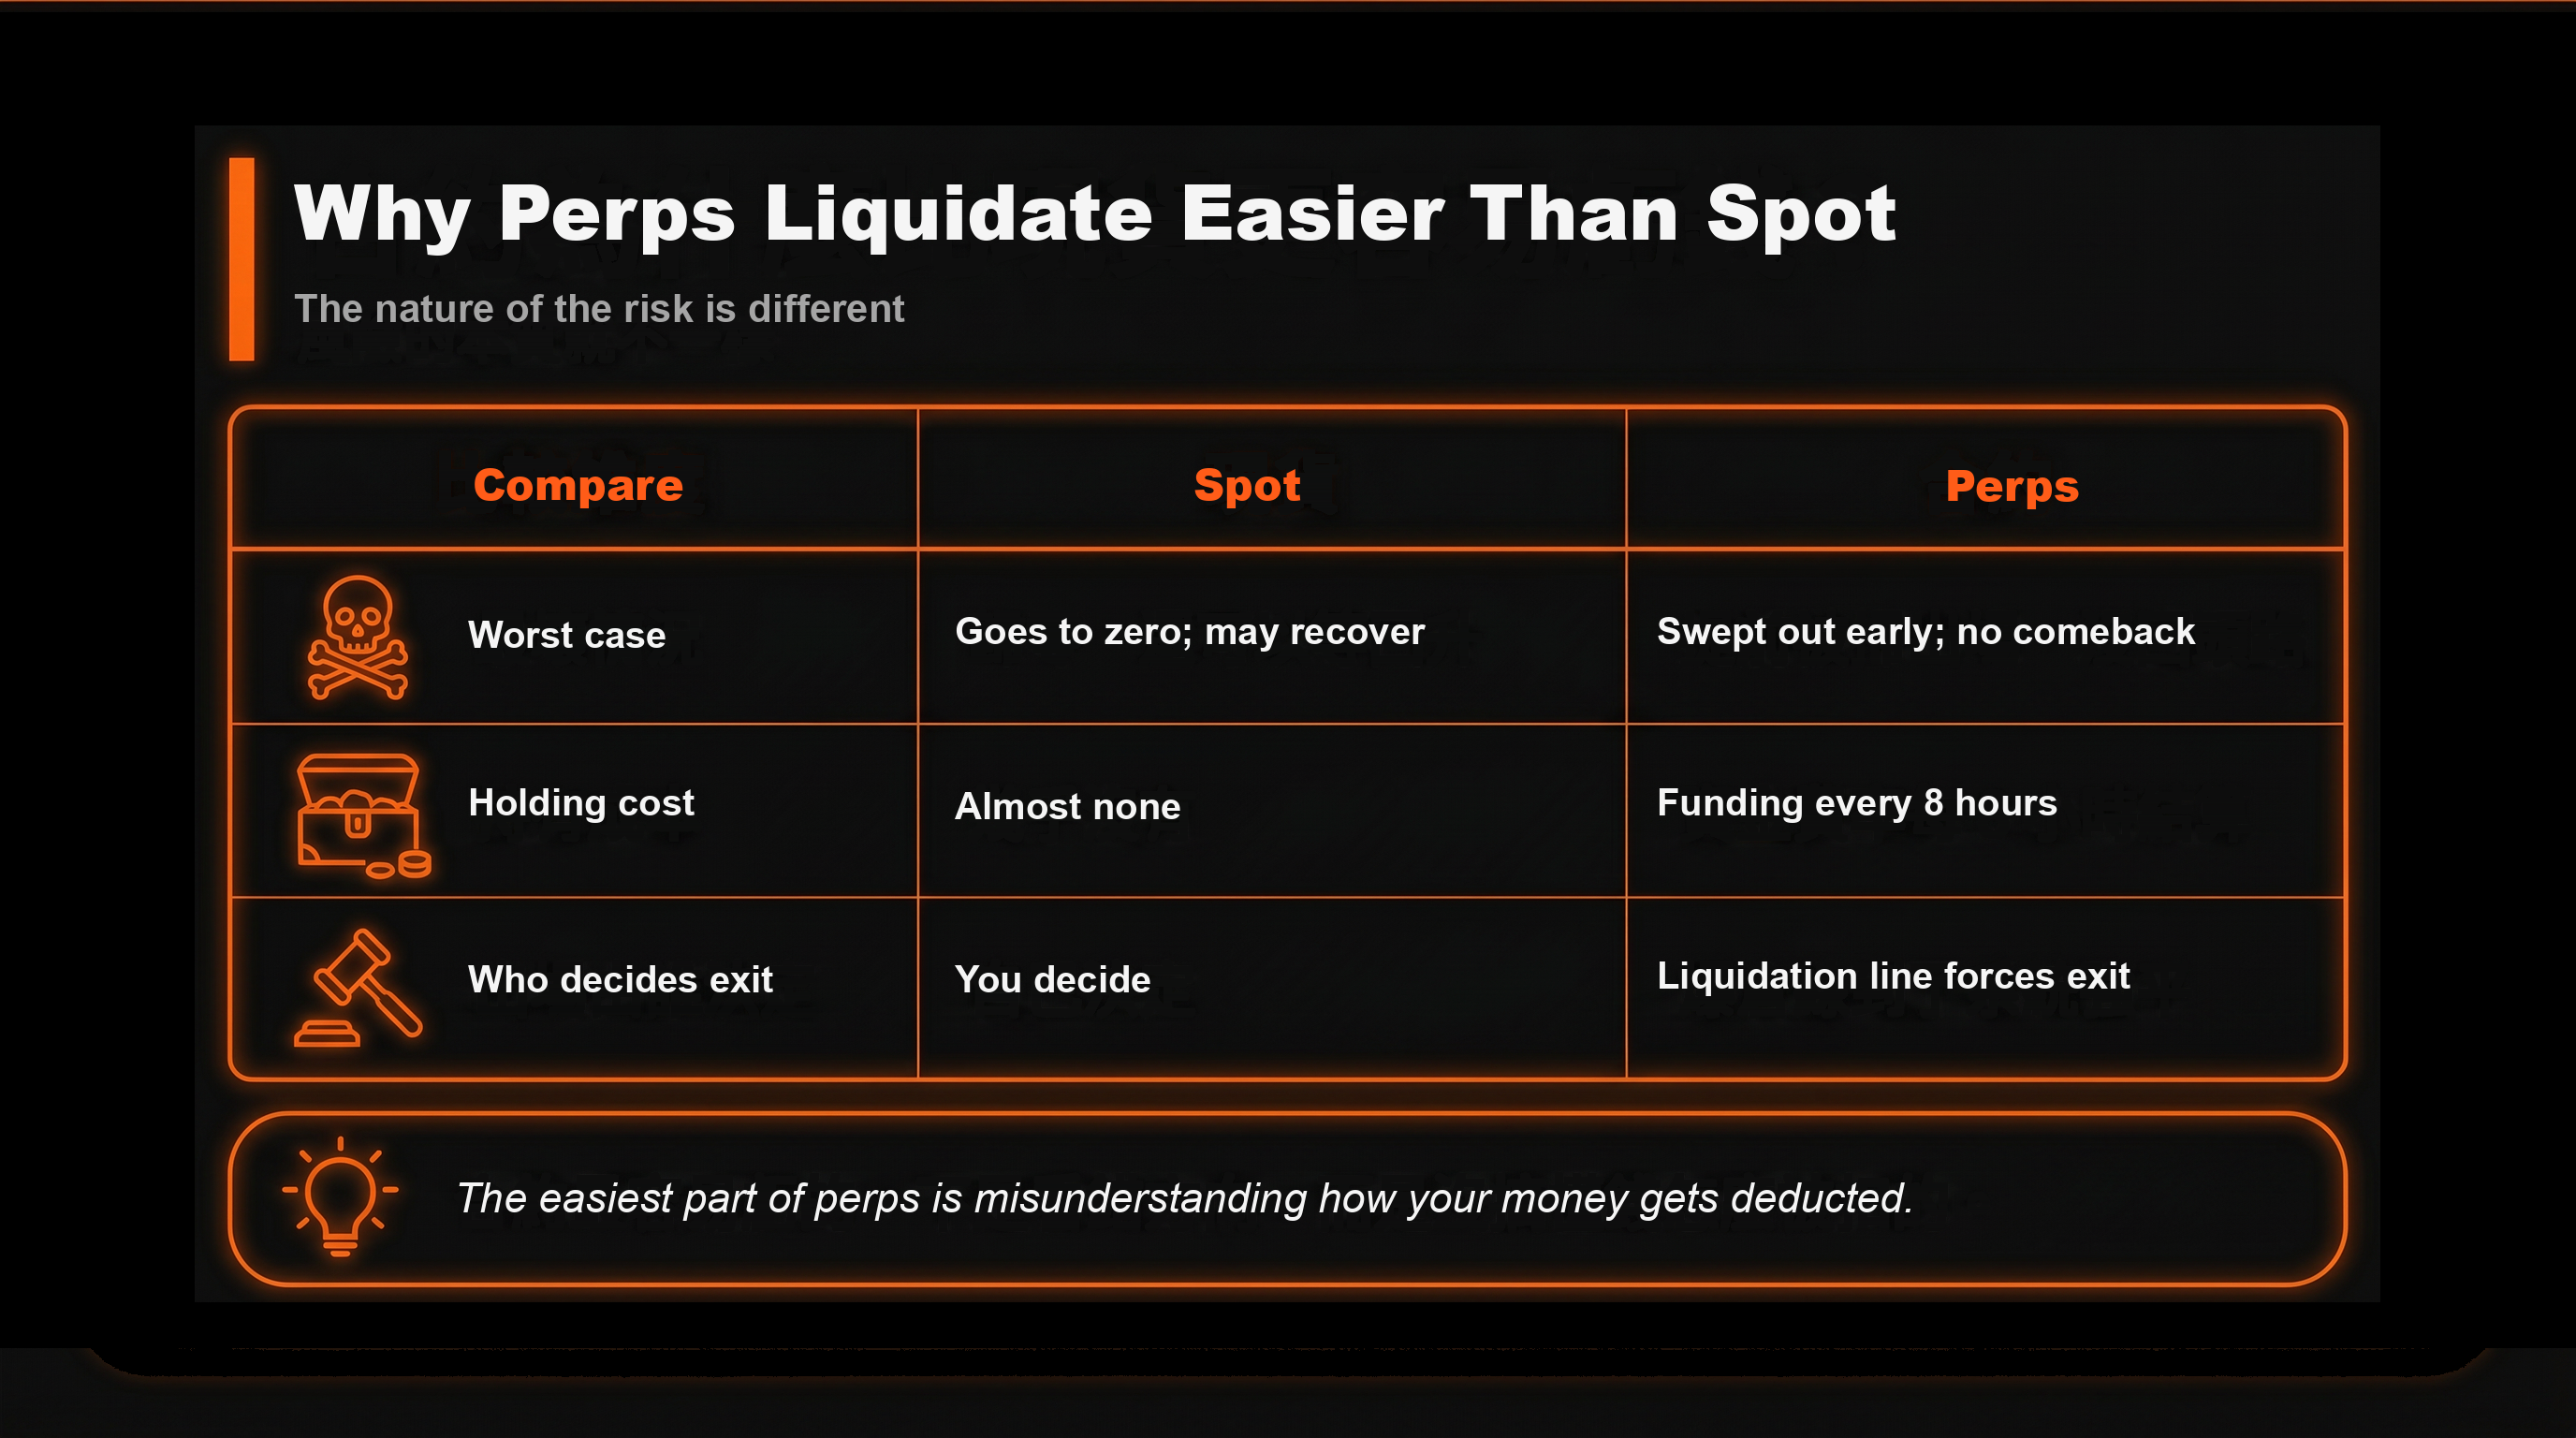
With spot the worst case is going to zero; with futures you get knocked out early
Let's start with the most fundamental difference. With spot, you buy coins with real money and just hold them, and the worst case is that the price falls all the way to zero and your balance is wiped out on paper — but as long as you don't sell and don't get liquidated, if the price recovers someday, your position is still there. Futures don't work that way at all. They're leveraged contracts: you put up only a small slice of margin to bet on a position several times larger, and the moment the price moves a little against you, amplified by leverage, your margin can hit zero first and your position gets force-closed by the system.
This difference is critical, yet it's the one most beginners fail to grasp. In spot, time is usually on your side — even if you're underwater, you can wait it out; in futures, time and volatility are on the side of liquidation, and your position gets closed long before the market comes back. Here's how I put it to beginners: with spot you're afraid of the company or project going to zero; with futures you're afraid of being escorted out halfway there. The two fears are different, so the way you read the charts naturally differs too, which is exactly why the first thing a futures beginner should learn isn't how to time entries, but how to read risk metrics.
Leverage, liquidation, and funding rate all press down on you at once
The reason futures carry higher risk is that it isn't a single thing at work — it's three things pressing down on you at the same time. Leverage amplifies volatility, turning painless little moves into real gains and losses; the liquidation mechanism sets a hard deadline, forcing you out once you lose to a certain point, with no room for negotiation; and the funding rate is like a clock that keeps ticking — as long as you hold the position, the cost keeps piling up bit by bit.
Any one of these three isn't complicated on its own, but stacked together they form the risk structure unique to futures. Many beginners only understand one of them — usually the part where leverage magnifies gains — and rush in, only to get schooled by the other two they never noticed. When I coach people, I stress that you don't have to become a pro from day one, but you at least need to know these three things exist, and know when and how they'll come bite you. Breaking these three down one by one is exactly what the rest of this article does.
Beginners should look at risk first, not the entry point
Once you understand the difference above, you'll see why I keep stressing the order: for beginners in futures, learning to read risk metrics matters far more than learning to time entries. This isn't grandstanding — it's because in futures, a risk number you failed to account for does far more damage than an entry point you didn't nail.
If your entry is a little off, the worst you get is smaller gains or a small loss — your position is still there and you still have room to adjust. But if you haven't worked out the risk clearly — say you don't know where your liquidation price is, or you used too much leverage — then a single normal pullback in the market can get you liquidated before you even get a chance to explain yourself. I've seen far too many people who actually had the direction right, but because their leverage was too high and their liquidation price too close, they got swept out by a single pullback wick before the move even got going, then watched it go exactly the way they'd called. So every metric in this article revolves around the same thing: before you place an order, work out the worst-case scenario first. Keep this order in mind, and every metric that follows will make far more sense to you.
Metric 1: Funding Rate — the hidden cost of holding a position
"Why did money disappear from my account out of nowhere?" A lot of beginners, the first time they get charged the funding rate, assume the platform is skimming fees — but this is actually a normal mechanism of perpetual contracts. This section explains the funding rate thoroughly, because it's the kind of hidden cost that looks small but quietly eats into your returns over time. Understand it, and you won't be baffled by random numbers on your statement.
What the funding rate actually is, and who pays whom
Let's nail down the definition. The funding rate is a fee that longs and shorts in perpetual contracts pay each other on a regular schedule, commonly settled once every 8 hours. Its purpose is to keep the price of perpetual contracts from drifting too far from the spot price: when too many people are long and push the contract price above spot, the longs pay the shorts; conversely, when too many people are short, the shorts pay the longs.
In other words, this money isn't taken by the platform — it's the price the side with more one-sided sentiment pays to subsidize the other side. This also brings up a point beginners easily overlook: if the direction you're holding happens to line up with the market's mainstream sentiment at the time, you're very likely the one who has to keep paying. For example, when everyone is frantically going long and the market is red-hot, if you go long too, then even though your direction matches the market, it also means you keep shelling out to follow the crowd. The way I understand the funding rate is as a toll the market charges on overheated sentiment — whoever stands on the more crowded side pays more.
The rate looks small, but it slowly grinds down long-held positions
The most deceptive thing about the funding rate for beginners is that a single charge really does look tiny — so tiny it makes you feel you don't need to care. But the hidden cost of futures hides precisely in that don't-need-to-care illusion. It settles once every 8 hours, meaning it's deducted three times a day, and if you hold a position for several days or longer, these seemingly trivial fees add up and gnaw at your returns bit by bit — even grinding down your principal when the market is chopping sideways and barely moving.
I've seen beginners who actually had the direction right, with the price moving just as they expected, but because they held a heavy position long-term on the side that pays a high rate, when they tallied it all up they found a good chunk of the price gains they'd made had been eaten by the funding rate. This is the classic case of getting the direction right but not accounting for the cost. So before I enter, I always take a look at what the current funding rate is and which side is paying, and factor this holding cost into my calculations, rather than just fixating on how high the price will go. The longer you hold a position, the less you can afford to ignore this ticking clock.
How to factor the funding rate into your decisions
Once you know the funding rate exists, the next step is to turn it into a habit you actually check before placing an order, rather than something you only discover on your statement afterward. In practice this is actually simple — the hard part is remembering to do it.
Here's my own habit: before entering, I take a look at how high the current rate is and which direction it's going, and if the direction I want to take happens to be the side that has to pay and the rate is on the high side, I add another layer of thinking — how long do I plan to hold this position? If I'm just doing a short-term trade and getting out within a few hours, the rate's impact is limited; but if I plan to hold for several days, this holding cost has to be seriously factored in, and it might even lead me to adjust my entry and exit timing, or simply wait until the rate falls back and the market is less crowded before entering. The funding rate won't decide your profit or loss on its own, but it's the kind of detail that quietly deducts money the moment you ignore it. Make checking the rate as natural as checking the price, and your cost awareness will be clearer than most beginners'.
Metric 2: Liquidation Price — the first number you should work out before entering
"Why did the price barely drop and I already got force-liquidated?" The answer almost always points to the same number: the liquidation price. This section is where I'll put the most effort, because of all the metrics, the liquidation price is the first — and the one you most need to work out clearly — before you place an order. Skip even this, and everything else is just talk.
What the liquidation price is, and what happens when you hit it
Let's spell it out. The liquidation price, also called the force-liquidation price, is the price at which the system force-closes your position when your losses are about to wipe out your margin. It isn't a suggestion — it's a rock-hard deadline: the instant the price touches this point, the system automatically closes your position — it won't wait for you and it won't ask for your opinion.
When you hit the liquidation price, the consequences are pretty total. Your position is automatically closed, the margin you put in goes to nearly zero, and much of the time you're also charged an extra liquidation fee — a second cut on top of the loss. For beginners, this is exactly why I list it as the first number to work out before entering: you have to know first, at the leverage and margin I'm using right now, at what price would a move against me knock me out? How far this price sits from your entry price directly determines how much volatility this trade can withstand. Entering without even knowing where this deadline is really is no different from driving with your eyes closed.
How close the liquidation price is to the current price decides whether you can survive normal volatility
Knowing what the liquidation price is still isn't enough — what really matters is exactly how close it is to your entry price. This distance is what decides whether a single bout of normal volatility will sweep you out of your position.
The daily volatility of the crypto market is already far from small — swinging a few percent up and down in a day is routine. If your liquidation price sits very close to the current price — usually because your leverage is too high — then a pullback that doesn't even count as bad news, just the market breathing normally, is enough to sweep you to your liquidation price and force you out. This is the most unfair way many beginners die: getting the direction right but dying in a bout of normal volatility. When I coach people, I repeatedly stress that when you calculate your liquidation price, you can't just calculate where it is — you also have to calculate whether it's far enough from the current price to withstand this coin's everyday swings. If you find your liquidation price is so close that an ordinary pullback would touch it, that's not the market's problem — it's your leverage or position size that needs adjusting.
Work out the worst case first, then decide whether to enter
Put the two points above together and you get the habit I think is most worth building for beginners: before you place an order, work out the worst case first, then decide whether to enter and how much. Reverse this order and your risk management becomes meaningless.
How exactly? Before you hit the button to open a position, ask yourself a very practical question: if this trade goes completely the wrong way and the price runs all the way to my liquidation price, my margin gets wiped out — can I afford that amount? Will it disrupt my life or other plans? If the answer is that you can't afford it, then instead of gambling that it won't happen, you should shrink the position or lower the leverage right then, so the worst case lands within a range you can bear. For every trade, I work out this worst-case number first and confirm I accept it before I actually enter. Front-load the worst case, and what you're doing is no longer a bet on luck but a decision where you already know where the floor is and can afford to lose. This step is the watershed between a futures beginner messing around and one who actually knows how to play.
Metrics 3 & 4: Leverage and Margin Mode decide the speed and scope of your losses
"Besides the funding rate and liquidation, what else do I absolutely have to watch?" These two metrics, leverage and margin mode — one decides how close your liquidation price sits to the current price and how fast losses arrive, the other decides which money gets tapped when you lose and whether the damage spreads across your whole account. This section explains these two settings that beginners so often underestimate.
Leverage amplifies both directions, not just gains
Let's start with leverage, since it's the one beginners misunderstand most deeply. Leverage lets you open a position several times larger with less margin, which sounds great — small principal, yet a shot at a big return. But the most common and most dangerous misunderstanding for beginners is seeing only the side that amplifies gains, completely ignoring that it amplifies losses in equal proportion. With 10x leverage, gains are amplified 10x when you win, and losses are amplified 10x just the same when you lose — two sides of the same coin, you can't take the upside without the downside.
Worse still, the higher you crank the leverage, the closer your liquidation price sits to the current price. This means the price only has to swing a little against you and you can get swept out, never lasting until the move comes back. My advice to beginners is always blunt: start with low leverage and leave yourself plenty of margin for error. Low leverage means your liquidation price sits farther from the current price, the market has more room to swing normally without hitting your deadline, and you have the breathing space to wait out a move that needed time to develop in the first place. Don't use the platform's maximum multiple to gamble the moment you enter — that isn't trading, that's pushing yourself toward the liquidation price as fast as possible.
Margin mode: isolated or cross — the difference is whether losses spread
The second thing to watch is margin mode, which decides which money in your account actually gets tapped when you lose. Many beginners just skip this setting, but it directly determines whether a single loss spreads and hits your other positions or even your whole account.
It mainly comes in two modes, and the difference is actually easy to grasp. Isolated margin means the margin for each of your positions is independent — this trade loses at most the margin you allocated to it, the loss is locked inside this one position and won't drag in the rest of your account's money, so the loss is controllable.Cross margin, on the other hand, uses your entire account balance as margin for this position; the upside is strong resilience — it isn't easily blown up by a momentary swing and can hold out longer — but the downside is just as obvious: once it really does blow up, it could damage all of your account's funds, not just one chunk. My advice to beginners is to start with isolated margin:
- Isolated margin: each position's margin is independent, and a single trade loses at most this one position — the loss is locked and controllable, suited to beginners who are still learning.
- Cross margin: your entire account balance serves as margin together, holds out longer, but a blow-up could damage all your funds — save it for after you know the rules.
Simply put, in the beginner stage use isolated margin first, locking the maximum loss of each trade into a range you can calculate clearly and afford to lose, and once you're truly familiar with the rhythm of futures and have built your own risk-management discipline, then consider whether to use cross margin.Play it safe first, level up later — in futures this order has almost no exceptions.
Leverage and margin mode should be viewed together
Leverage and margin mode are best not looked at separately, because they interact with each other. Leverage decides how close your liquidation price sits to the current price — that is, how easily you hit the deadline; margin mode decides how big the fire spreads when you do hit the deadline. The two settings combined are what give you the real risk profile of this trade.
Here's a contrast that makes it click: high leverage paired with cross margin is one of the most dangerous combinations for beginners — the liquidation price is close and you're backing it with your whole account, so once you call the direction wrong, a single trade could damage all your funds; conversely, low leverage paired with isolated margin is the most conservative combination for beginners to practice with — the liquidation price sits far away, and even if you do get blown up, the loss is locked into this one trade. When I set things up for beginners, I first dial both of these knobs to the conservative side, and only once they have a handle on their own judgment and emotional control do I move them forward one notch at a time. Don't treat these two settings as options you click past when opening a position — combined, they basically decide how long and how steadily you'll last on the futures road.
Metric 5: Open Interest, and the beginner's pre-entry risk check
"What's the last metric, and once I understand all this, what else do I need to do before placing an order?" This section first explains open interest, a metric used to gauge the market's mood, then pulls the earlier five metrics together into a checklist you can run through before entering, to help you fend off most of the liquidation disasters common among beginners.
What open interest is, and what it can tell you
First, open interest — often abbreviated OI — refers to the total amount of contracts currently still open in the market. It's different from trading volume: volume looks at how much was bought and sold over a stretch of time, while open interest looks at how many unsettled contracts are sitting out there in the market right now. This number helps you roughly gauge the current strength of longs versus shorts and how hot the sentiment has gotten.
How do you read it? When open interest is climbing fast, it usually means more and more leveraged money is pouring in and piling up in the market. At this point, watch out for one risk: once leverage accumulates too much and gets too crowded, the market becomes fragile, and the price only needs one move in the opposite direction to trigger a chain of force-liquidations, turning into cascading liquidations and a price crash of a big chunk in an instant. So I understand open interest as a thermometer measuring whether the market's leverage is overheating, not as a signal telling you to buy or sell. It doesn't point a direction on its own, but it can remind you whether the market right now is in a high-pressure state that could blow at any spark.
How to read open interest alongside the earlier four metrics
Open interest has limited meaning on its own — its real value is reading it together with the earlier four metrics to help you judge whether the current entry timing is actually safe.It isn't an entry signal but a background parameter for environmental risk.
Here's a concrete example: suppose you've worked out your liquidation price and used low leverage and isolated margin — that's your own risk management for this one trade; but if at this point you notice the whole market's open interest is spiking fast and leverage is clearly overheated, that's a reminder that the environment itself is especially prone to violent cascading liquidations that could sweep you in along with it. In times like these, I might choose to be a bit more conservative — shrinking the position further, or simply waiting until this overheated leverage gets flushed out and the market cools down before entering. Layer open interest, this environmental thermometer, on top of your own personal risk management of liquidation price, leverage, and margin, and read them together, and your feel for risk will be far more three-dimensional than someone who only stares at the price.
The risk checklist to run through before placing an order
Tying these 5 metrics together, I want to finish by giving you a checklist I run through in my head before opening every position. It won't guarantee you make money, but it can help you fend off the vast majority of the most common and most unfair liquidation disasters beginners face — the kind of loss that happens purely because some number wasn't accounted for. Before placing an order, run yourself through these checks:
- Work out the liquidation price: at my current leverage and margin, at what price would I get force-liquidated? Can this distance withstand normal volatility?
- Use isolated margin and low leverage: have I first locked down my single-trade loss and left plenty of margin for error, rather than using the maximum multiple right off the bat?
- Check the funding rate: for the time I plan to hold this position, have I factored in this hidden holding cost?
- Check open interest: is the whole market's leverage overheated right now, is the environment itself especially prone to cascading liquidations?
- Set a stop-loss: before hitting the liquidation price, have I set myself an active stop-loss line to exit first?
Once you've run through these 5 steps, you can pretty much avoid ninety percent of beginners' rookie mistakes. Its core spirit is actually simple: before you think about how much this trade could make, work out first what the worst case is and how much you could lose.Risk control should always come before imagining the reward — this isn't cowardice; it's something you'll eventually have to learn if you want to last a while in the futures arena. Turn this checklist into a reflex before you place an order, and you're already far steadier than most beginners who enter on gut feel.
Conclusion
This article breaks down the 5 metrics a futures beginner should understand most — funding rate, liquidation price, leverage, margin mode, and open interest — one by one, then pulls them together into a pre-entry risk check. Back to that line at the very start: what most easily makes people lose money in futures is often not getting the direction wrong, but not understanding how the money gets deducted and when the position gets closed. The funding rate is the hidden cost while you hold; the liquidation price is the first deadline you should work out before entering; leverage and margin mode decide the speed and scope of your losses; and open interest helps you feel the leverage temperature of the whole market. Working out these numbers first, setting your stop-loss before the liquidation price, and only then talking about how much you could make — that's far steadier than charging in and regretting it afterward. Learn not to get swept out first, and only then have you earned the right to talk about making money in futures.


