

"Where exactly do you look in SNR trading so you don't chase the wrong breakout?" Many traders aren't unable to read candles — they know support and resistance, but when it comes to actually placing the order, they treat fake breakouts as real, treat pullbacks as reversals, and end up either washed out or stopped at the most awkward spot. This article first walks through what SNR is really pointing at, then breaks down how to tell true from fake breakouts, what conditions to check before entry, and the most common mistakes — to clean up your entry process.
What Is SNR? Support and Resistance Aren't Lines
"Isn't SNR trading just drawing a few lines on the chart?" The real headache is treating those lines as dead — so the moment price pokes through, you assume the level failed. This section starts by reframing what SNR is actually pointing at.
What Is SNR? Why It's Really About Support and Resistance
In a trading context, SNR usually refers to Support and Resistance. The simplest framing: when price reaches certain zones, the market often reacts visibly — either bouncing off support, or hitting selling pressure overhead. It's not a fancy proprietary strategy, it's observing where price has historically stalled, reversed, paused, or accelerated. The job isn't to memorize patterns — it's to understand which levels typically shift buying and selling pressure.
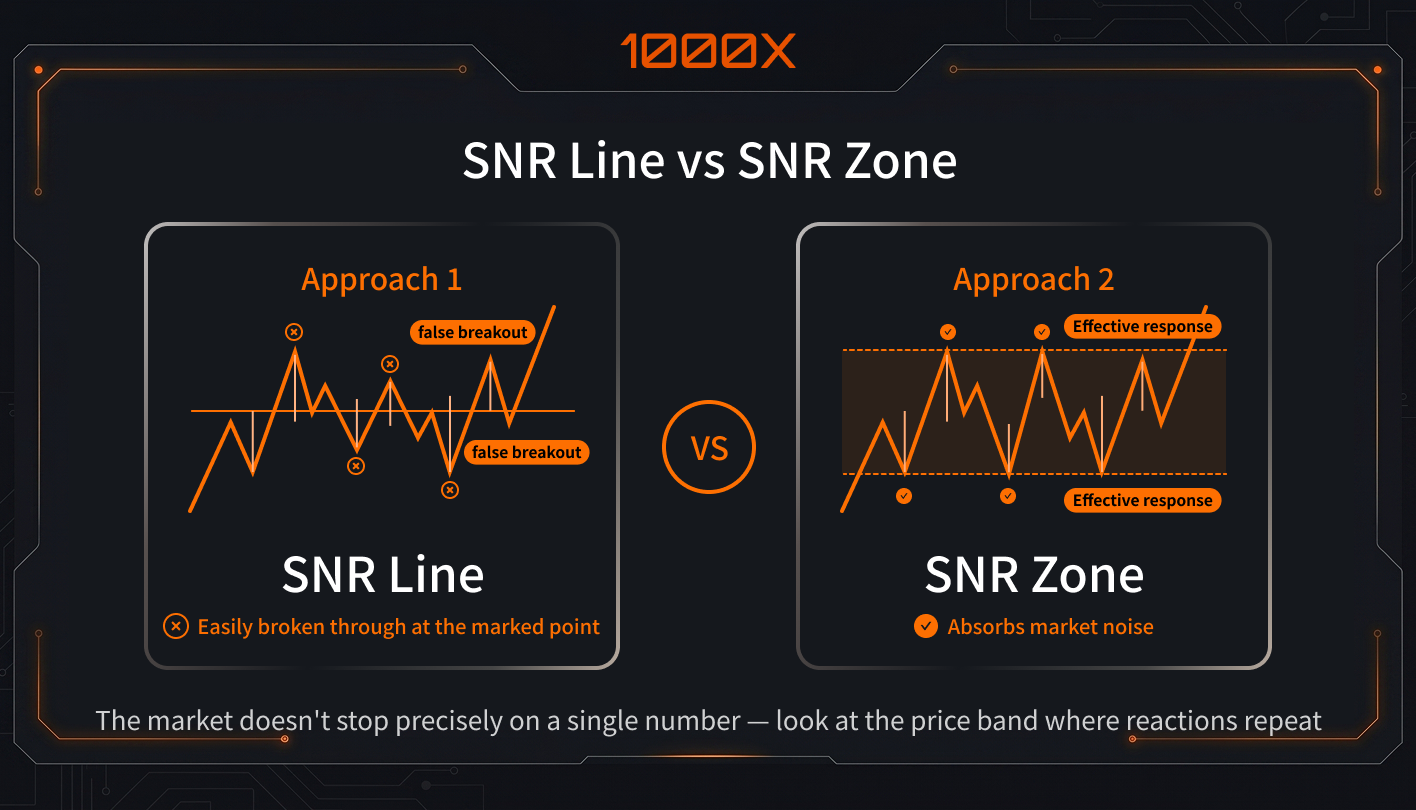
Why You Should Draw SNR as a Zone, Not a Line
The one thing I most often remind newcomers using SNR…

A precise horizontal line, then assuming you misread the moment price ticks a few points beyond it. The problem: markets don't move by a ruler. What makes support and resistance actually effective is usually not one exact number, but a price band with repeated reactions. People placing orders won't always sit at the same point — institutions, retail, and algos don't enter and exit at identical prices, so prices often poke through first, then pull back, or react ahead of time. That's why when I draw SNR, I care more about "the zone's boundaries" and "how price reacts after entering the zone" than whether a single line got touched.
What Repeated Reactions at the Same Price Are Telling You
When a price keeps producing bounces, rejections, pauses, or volume spikes at the same area, that area is usually being treated by the market as a "key zone with memory". That's not just clean charting — it means buyers and sellers are actually re-engaging there, so price tends to react again next time. What I watch isn't just "how many times it's been touched" — it's whether each reaction is getting weaker: if it bounces on touch, support is still defending; if bounces get shorter and closes push deeper into the zone, that's usually a warning the level won't hold much longer.
Real vs. Fake Breakouts — 3 Pre-Entry Checks
"Price went through — does that mean the breakout is in?" A lot of losses don't come from getting direction wrong; they come from treating a wiggle as a valid breakout too early. This section lays out the most practical pre-entry order.
Look at the Close, Not Just the Wick
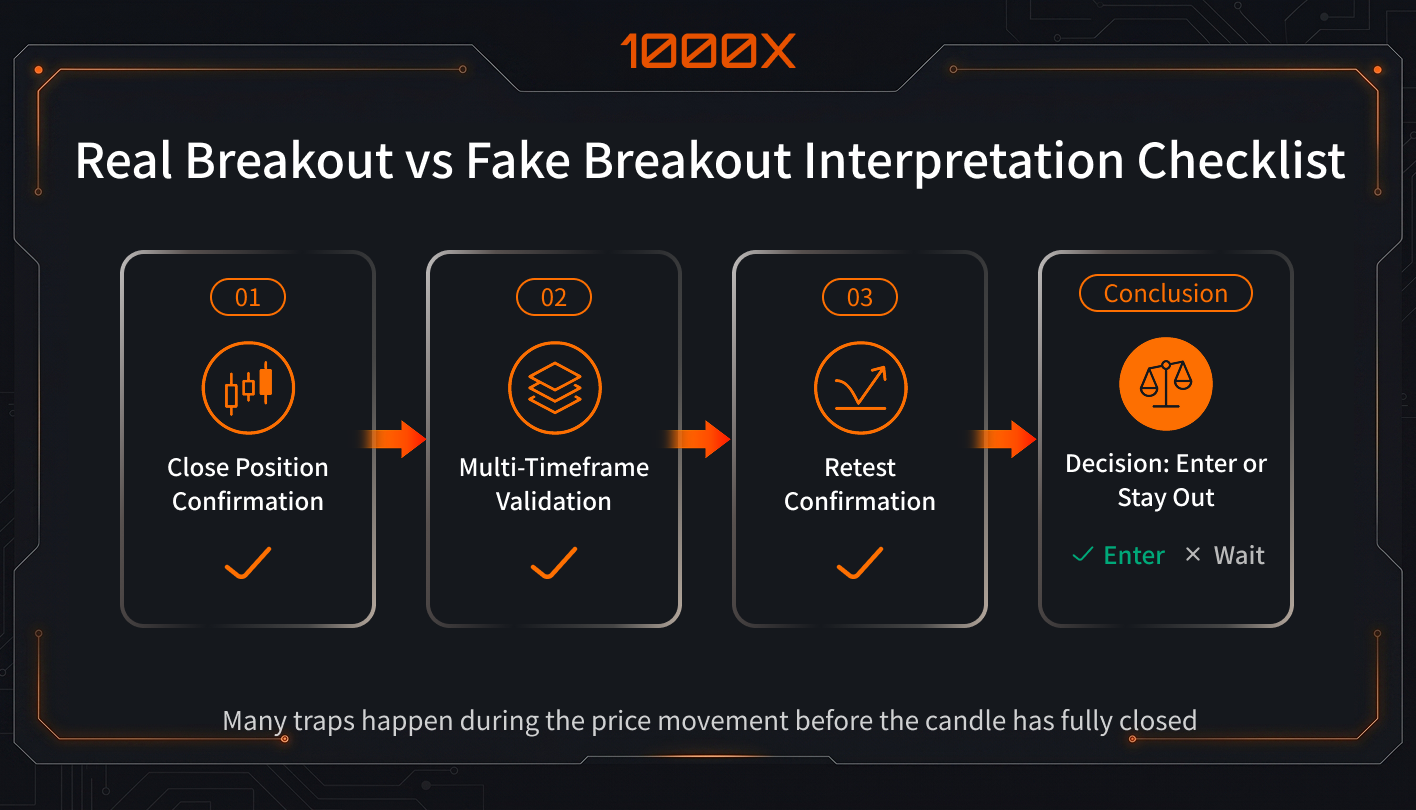
Support or resistance — and rushing to call it a confirmed breakout. That's a very common misread, what matters isn't "did it cross intraday," it's where this candle finally closes. If price just briefly pokes through the key zone and closes back inside the original range, that's closer to a fake breakout — the market tried to push out, but didn't truly hold. Conversely, if the close clearly sits above resistance or below support, that's more like a breakout with continuation basis. When I read , my first move usually isn't to chase the wick — it's to wait for the close, because most traps happen in the part of the swing that hasn't closed yet.
Then Check the Retest — Don't Mistake a Bounce for Continuation
Just looking at the moment of the breakout isn't enough — I almost always check the "retest" hold. The reason is simple: valid breakouts often come back to test the original key zone — like price breaking above resistance, retesting it, and that prior resistance flipping into support. If price returns and immediately fails to hold, or quickly dumps back inside the prior range, that move is closer to a fake breakout — not the continuation you imagined. If the retest holds the zone and the close doesn't fall back through, the move has a better chance of following through, it's mistaking a "brief bounce" for "already holding".
Finally, Check the Timeframe Context and Volume
Looking at one candle in isolation makes it easy to treat noise as signal. So when judging SNR trades, my final two checks are: does this level make sense in a higher timeframe, and is the breakout backed by volume? Multi-timeframe analysis is a common filter for fake breakouts — a pretty breakout on the low timeframe might be just a wiggle inside a range on the higher one. If the level itself is sitting near a much larger pressure zone, forcing the trade usually carries more risk. Same with volume — a breakout without clear participation typically signals not enough engagement, and the follow-through tends to disappoint.
I think of this as the final filter: only after close and retest pass do you check whether this breakout has enough background to back it, it's getting carried away by a few fast candles on the low timeframe and forgetting the trade is bumping into a much larger key zone.
A Clean SNR Entry Flow — Zone, Confirm, Stop
"I know I should wait for confirmation, but what's the actual order when placing the order?" Plenty of traders get stuck not on concepts but on execution sequence. This section locks in the practical order.
Find the Main Zone on a Higher Timeframe, Then Drop to a Lower One for Reactions
If SNR trading starts on the low timeframe, it's easy to get dragged around by short-term swings. So I typically find the main zones on a higher timeframe first — confirming which support and resistance areas actually carry weight — and then drop to the lower timeframe to watch how price reacts once it enters the zone. The advantage: you're not just looking at one candle in front of you; you can see whether this position is a trend-following breakout in the larger structure, or a collision with higher-timeframe pressure. Multi-timeframe analysis is built to filter noise — especially in markets full of fake breakouts, the higher-timeframe key zones usually deserve the first look. So:
- Use a higher timeframe to find the main support/resistance zones first.
- Then drop to a lower timeframe to watch for closes back inside, retests, volume expansion, or clear rejections.
Entries built this way have a real basis — you won't be forcing trades into noise just because the low timeframe looks like a breakout.
After a Breakout, Don't Chase — Wait for the Retest and Candle Confirmation
When I see a breakout, my first reaction is always —…
A lot of newcomers see price punch through a level, and the gut reaction is to chase, fearing you'll miss the move, what often goes wrong isn't missing the breakout — it's calling the breakout confirmed too early. The steadier approach is usually to wait for price to come back and test the freshly broken zone, then watch for candle signals that hold; if the retest fails and price quickly dumps back inside the original range, that move is closer to a fake breakout. Conversely, if the retest holds the key zone and following candles show clear rejection or close back above, the breakout has a real basis to continue.
I treat this step as a filter: breakout first, then retest, then confirmation. The point isn't to slow down the entry — it's to avoid the spot where fake breakouts most commonly trick you on first move.
How to Place Stops, Entries, and Targets So You Don't Run Yourself into Chaos
SNR trading genuinely runs into chaos — usually not from misreading the chart but because entry, stop, and target weren't planned before placing the order. I lock the order in advance: decide which zone to enter at, then think through "if I'm wrong, where do I admit it and exit," and only then check whether the trade has a reasonable target. Trading with support and resistance, a common practice is to put the entry after the key-zone confirmation, and put the stop at the invalidation level below support or above resistance, not at some random number; target placement looks first at the next clear support or resistance zone, since that's typically where price next gets stuck.
If you're trading a breakout-then-retest, the flow can be even simpler:
- Entry: Wait for the retest into the breakout zone, then check whether the candle holds.
- Stop: At the level where the retest fails — the structural invalidation point. Not too tight, not so loose that the risk runs away.
- Target: Look at the next pressure or support zone, then verify whether this trade's risk-reward is worth taking.
Most of the chaos isn't from chasing wicks — it's from never deciding before entry where you'd exit if the price didn't follow the script.
3 Common SNR Mistakes — Execution, Not Direction
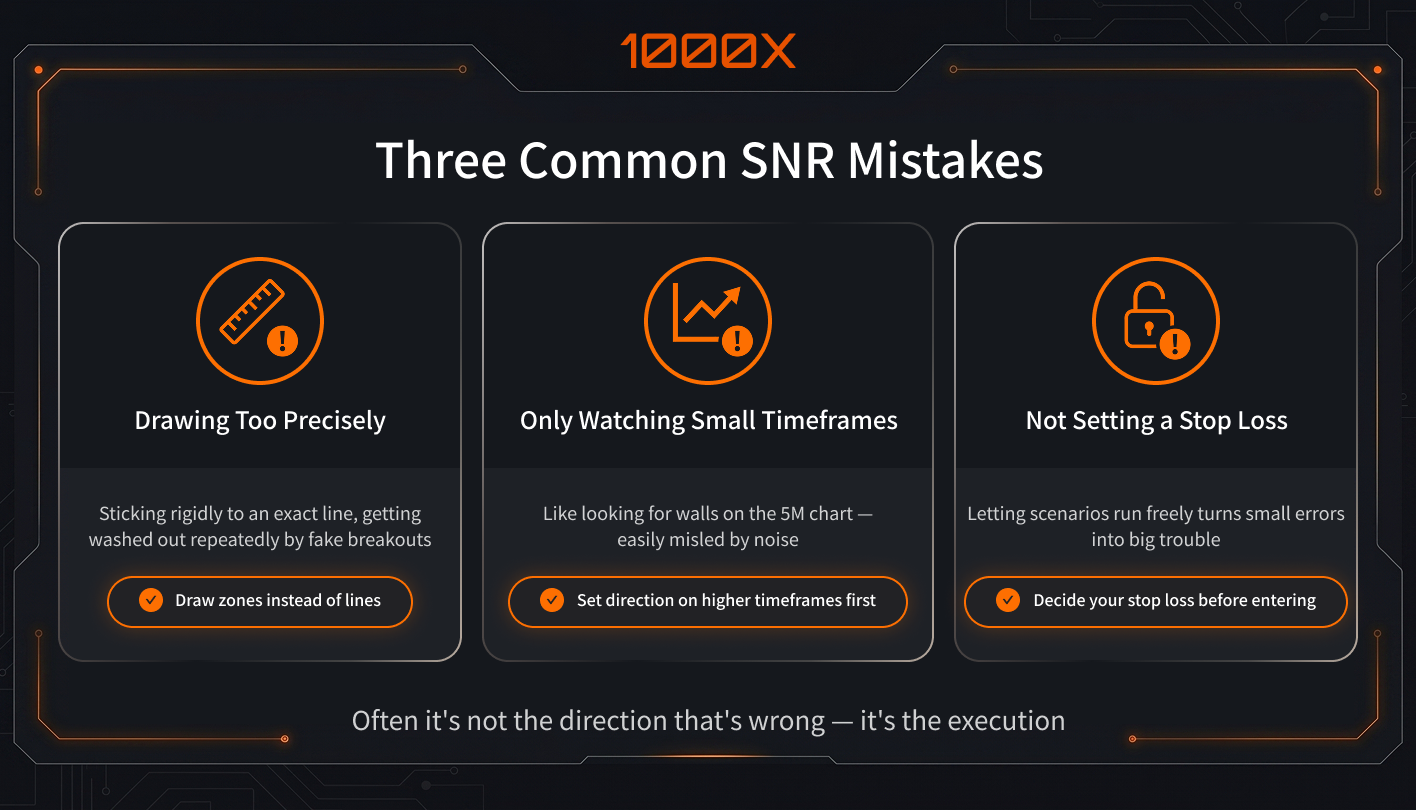
"I know how to draw SNR — why do I still get washed out?" Many issues aren't from cluelessness; they're from a few details going wrong on repeat. This section consolidates the most common pitfalls.
Drawing Support and Resistance Too Precisely, Forgetting They're Zones
This is the most common first mistake people make in SNR trading: drawing support and resistance as a single "just-right" line, so the moment price pokes a little beyond it, doubt creeps in. The problem: support and resistance are closer to zones than to single price points. The buying and selling forces, order density, and trading psychology in the market won't always sit at a single exact number, so price often pokes through, lingers, and closes back; if you only defend a single line, you'll easily treat normal noise as invalidation.
When I draw SNR, I first locate ranges where price has repeatedly stalled, reversed, or surged in volume, then consolidate them into a band with upper and lower boundaries. The benefit: when judging breakouts later, what you're reading isn't just "did it touch the line" — it's how price reacts after entering the zone (held by buyers? rejected by sellers? actually closing through?). Fake breakouts trick people by looking too precise — the market's natural noise gets ignored.
Entering the Moment Price Touches the Key Level, Skipping Confirmation
This mistake is everywhere: price touches support or resistance, and the urge is to enter immediately, afraid of missing the spot. The problem: the key level itself isn't an entry button, it's a reminder that "this area is worth watching". Without waiting for the close, retest, or volume confirmation, you'll easily buy fake breakouts and sell fake breakdowns — either washed out, or forced into a stop-loss the moment you enter. Most fake breakouts love trading against people who enter on touch.
I split the flow into two steps:
- Read the reaction first: Did the key zone get crossed cleanly, or did it close back, pause, or show clear rejection?
- Then wait for confirmation: At minimum, wait for the close, the retest to hold, or volume and structure to back the move before deciding to enter.
This isn't being overly cautious — it's avoiding the trap of mistaking "touched the key level" for "direction confirmed." Public trading education consistently treats waiting for confirmation and watching the retest hold as the standard filter.
Watching Only One Timeframe, Ignoring Larger Levels
Watching only one timeframe is one of the easier ways to misjudge in SNR trading. A clean breakout on the 5-minute chart doesn't mean the 1-hour or 4-hour chart agrees; many "strong" moves zoom out to be a small bounce inside a larger range, or right into a higher-timeframe resistance band. That's why I won't read just the few candles in front — I confirm whether the position is a breakout, retest, or pure noise in the larger structure first. The real mistake usually isn't bad chart-drawing, it's that the low-timeframe setup looks tradable while the higher timeframe has no room — and the trade gets slapped back the moment you enter.
The most common SNR mistake I've seen newcomers make…
Conclusion
This article aims to build not just SNR basics, but a steadier judgment habit before entry. , and ultimately treating fake breakouts as opportunities and noise as signal. If you also want a learning path where you're not just reading charts and guessing direction alone — but discussing key levels, breaking down entry logic, clarifying where to wait for confirmation and where not to force trades — come join us. More than chasing impressive-looking techniques, we focus on training each judgment call to be clearer.


