

"Have you watched lots of SMC tutorials and felt like you understood market structure, liquidity, and order blocks — but back on your own chart, you still don't know where to enter or where to stop?" This article won't package SMC as a magic method — it first breaks down what SMC is really looking at, in what order to judge things, which mistakes make newcomers lose more they study, and finally whether this framework actually suits you to learn now.
What Is SMC? Not a Magic Entry Signal
"Do you also feel — when others explain SMC it seems logical, but on your own chart, you only see a pile of jargon and still don't know what it's actually pointing at?" This section makes SMC's core logic plain — separating clearly that it's reading how the market moves, not guaranteeing where price must go up or down.
SMC Isn't an Indicator — It Uses Market Structure and Liquidity to Find Trading Logic
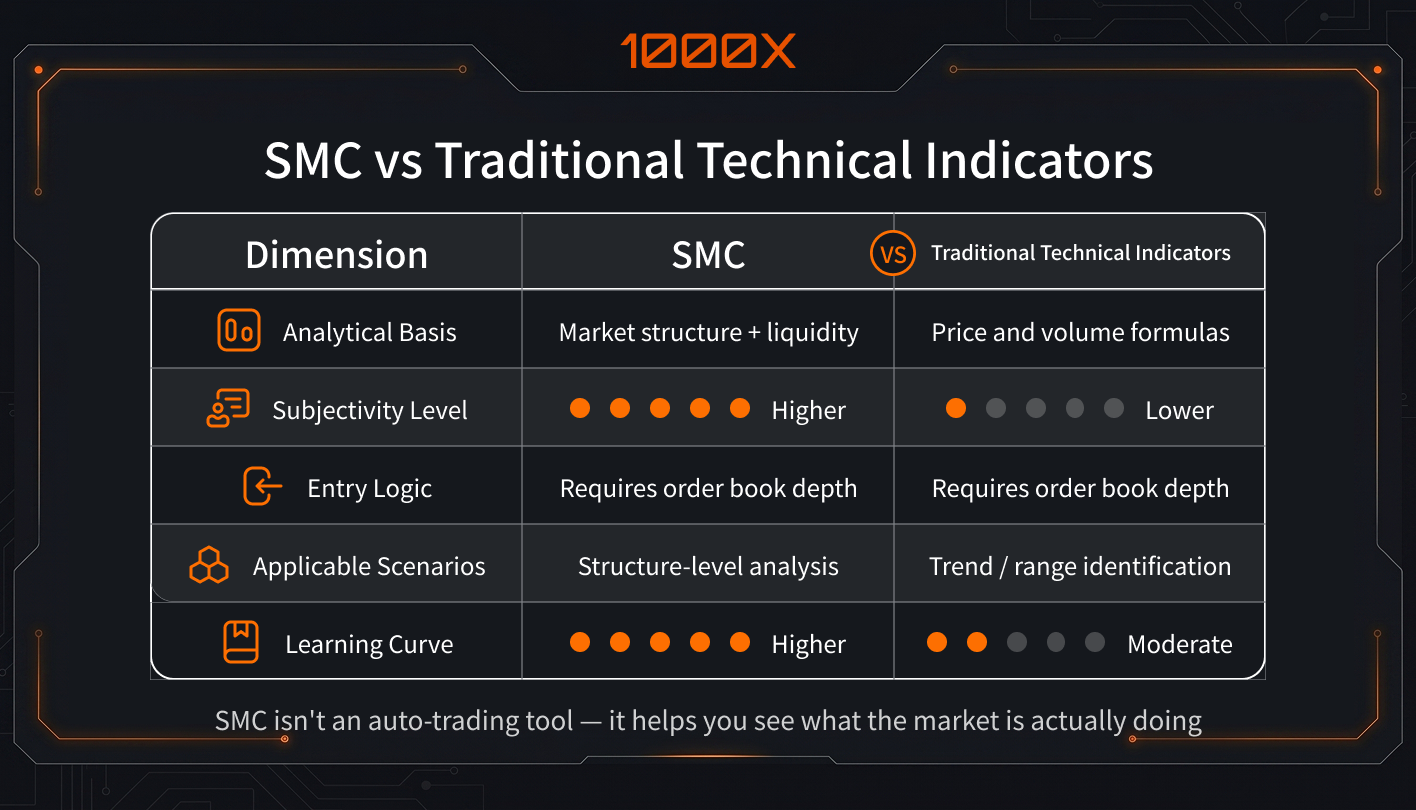
A lot of newcomers, when they first encounter SMC, treat it as a "more advanced technical indicator." But it really isn't MACD, RSI, or that kind of tool — drop it on the chart and it auto-generates signals. SMC is more like a set of reading frameworks: check whether market structure is extending or weakening first, then check whether liquidity near highs and lows has been swept, and only then understand why price moves quickly through certain zones. Most public teachings also put SMC in the context of "structure, liquidity, imbalance" — within the price-action lineage, not as a single entry/exit indicator.
In other words, treating SMC as an "auto-signal system" is itself a misread. If you only want to open a position based on one order block or one FVG (Fair Value Gap), you usually skip more important premises: is this trend-following or counter-trend, has this structure been broken, and is what got swept actual liquidity or just noise. SMC's value isn't in placing trades for you — it's in helping you read the chart with more logic, see what the market is doing first, then decide if this trade is worth taking.
Smart Money, Liquidity, Structure — What Each One Is Looking At
Break these three terms apart and you're less likely to get tangled in SMC jargon. "Smart money" doesn't mean you can actually see specific institutional orders — it's using price action to infer how large capital may be positioning. "Liquidity" in SMC often refers to zones where stops and resting orders cluster — like prior highs, prior lows, or obvious consolidation zones — because big orders need counterparties, and price often gets pulled toward these places; "structure" is whether the market is currently leaning bullish, bearish, or just chopping — the focus is on whether highs and lows keep advancing, not whether a single K-line looks pretty.
If you're new, I'd recommend understanding it in this order: structure first, then liquidity, and only then think about where smart money might act. Because structure helps you read the big direction, liquidity tells you where price might get pulled — and as for "smart money entering," that's fundamentally still an inference, not a directly verifiable signal. The most common newcomer mistake is mythologizing every high/low sweep as institutional action.
Why Learning More Terms Sometimes Makes Entries Messier
More terminology doesn't mean clearer judgment. SMC's common terms — order blocks, FVG, liquidity sweeps, MSS (market structure shift) — are inherently tools for organizing price action, not signals you enter on every time they appear. What actually makes this approach useful is still the bigger-picture read, liquidity location, entry zone, and risk control — you can't treat any single signal as the answer.
A lot of newcomers get more confused the more they study — usually not because of effort, but because they mistake "labeling lots of things" for "understanding deeply". For example, drawing too much on the chart so every zone looks like an opportunity; rushing to call reversals the moment a liquidity sweep shows up; hunting pretty entries without judging structure first. The steadier approach isn't memorizing more terms — it's fixing the same order: structure first, then liquidity, then deciding whether the zone is worth acting on. Otherwise the jargon just makes you more confident about wrong trades.
SMC Newcomers — 3 Judgment Cores First
"What you fear most isn't failing to understand — it's understanding a little, then rushing to hunt entries, right?" This section gives newcomers a more suitable judgment order: direction first, then liquidity, and only then entries — so you're not pulled around by local pictures from the start.
Check the Big-Picture Market Structure First — Don't Rush to Find Entries Right Away
A lot of newcomers, when looking at SMC, rush to mark order blocks, FVG, or liquidity sweep zones, but the real first step is to check market structure. Because structure isn't answering "where can I enter" — it's answering "which way is the market leaning, and is this trade trend-following or counter-trend?" Most teachings also center SMC on price action, liquidity, and market structure — not on traditional indicator signals themselves.
The first thing I check myself: whether the highs and lows are continuing. If price keeps printing HH/HL (Higher High/Higher Low, higher highs/higher lows), bullish structure is still intact; if it's LH/LL (Lower High/Lower Low, lower highs/lower lows), bearish structure hasn't been broken yet. Get this direction clear first, and then liquidity, order blocks, or structure shifts have context. Otherwise you'll easily hunt longs inside a bearish structure, or misread normal pullbacks in an uptrend as reversals. The most common newcomer pattern is reversed: hunting entries first, then back-fitting reasons. A more grounded order: check the big direction first, then where price might go take liquidity, and only then decide whether that zone is worth using as an entry reference. The benefit isn't making you right every time — it's pre-filtering out a lot of noise trades you shouldn't have touched anyway.
BOS (Break of Structure), CHoCH (Change of Character) — How to Read Them Without Mistaking Noise for Reversal
Lock the core difference first: BOS leans toward "the original trend is still extending" — e,g., a fresh break of a prior high inside bullish structure, or a fresh break of a prior low inside bearish structure; CHoCH is more like "the market's character is starting to shift" — inside the original trend, price breaks a key swing high/low in the opposite direction, reminding you this may not be a simple pullback. In other words, BOS is more of a continuation signal, CHoCH is more of a turn warning. But both are references, not standalone reversal confirmations.
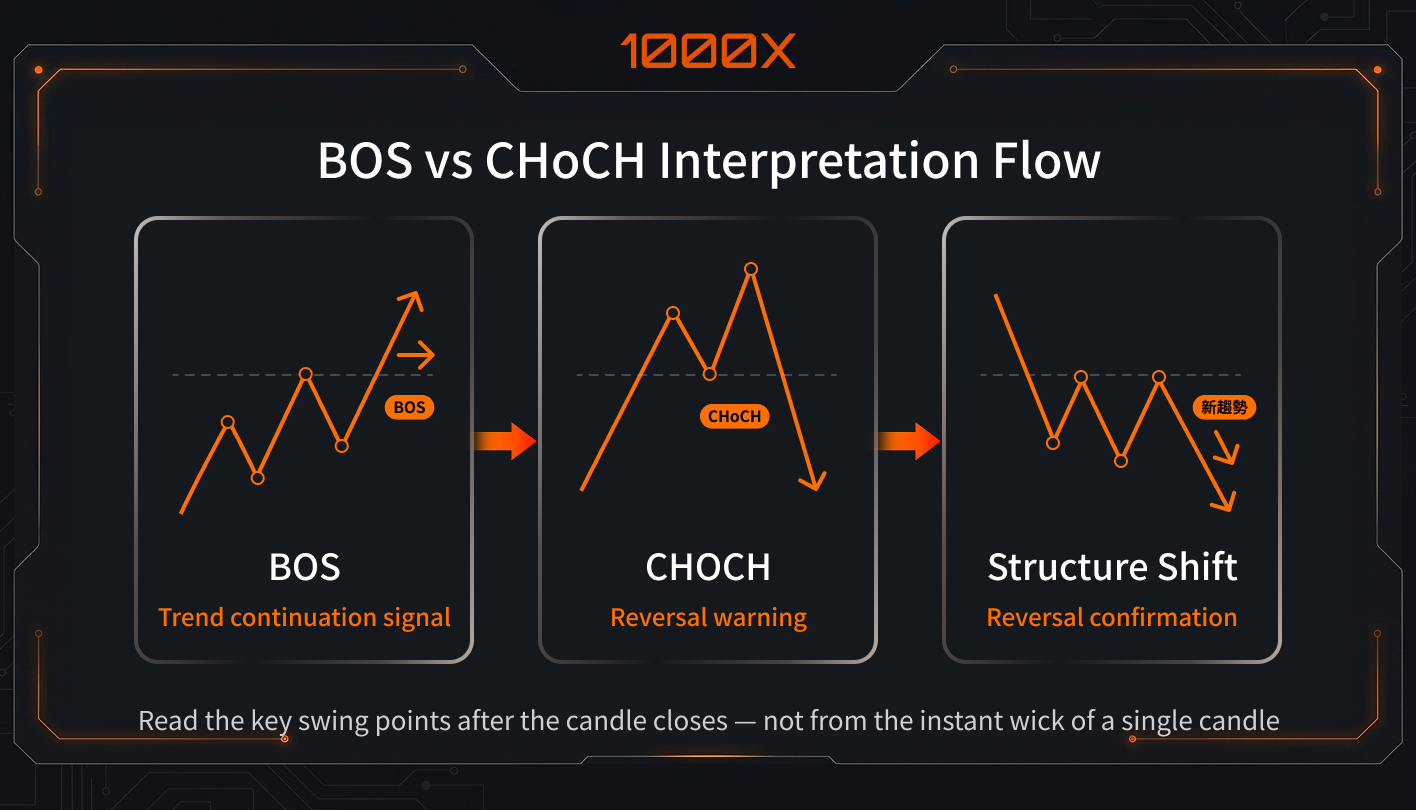
Newcomers most often mistake noise for reversals because: First, they see only one K candle wick out and treat the short-term sweep as CHoCH; Second, they look at minor internal swings rather than key swing highs/lows; Third, they hunt reversals on smaller timeframes without confirming the big direction first. A steadier view: confirm the higher-timeframe structure first, then check whether the break hits a previously valid structural point, and finally watch whether price actually holds or breaks — not just gets faked by a single wick. A lot of teachings also center on key swing high/swing low (swing highs/lows) and close levels — not on momentary spikes.
Order Blocks (Order Block) and FVG Can Assist, But Can't Alone Decide an Entry
Order blocks and FVG are often used as SMC entry references, but in reality they're "zones where price may react" — not buttons you press the moment you see them. FVG is essentially an imbalance zone left by fast price movement — the market may come back to fill it later. Order blocks are often used to mark zones where a strong prior push originated. The issue: both kinds of zones just tell you "this place deserves attention" — they don't guarantee price reverses on touch.
A common newcomer error is taking these signals as standalone reasons. For example, seeing FVG and assuming price must fill back into it, or seeing an order block and assuming the big players must defend it — overlooking earlier conditions: current big direction, nearby liquidity, whether structure actually confirms, and where to admit failure. Public teachings repeatedly emphasize that FVG usually isn't enough alone — it works better read alongside market structure, liquidity, structure breaks, or other confirmations.
I treat them as "tools for narrowing the observation zone," not entry reasons in themselves. A steadier order: check structure direction first, then check whether liquidity will get taken first, and only then see whether the order block or FVG offers a reasonable waiting zone. The point isn't a sudden jump in win rate — it's avoiding entering counter-trend, in noise, or without confirmation just because a "pretty zone" caught your eye.
SMC Pre-Trade Checks Before Chasing Liquidity Sweeps
"Do you often see price sweep highs and lows and feel an opportunity's arrived — only to enter and get shaken out?" This section doesn't do mysticism — just the most basic pre-entry check order, so you block impulsive entries first, then decide if this trade is worth taking.
Confirm First Whether This Trade Is Trend-Following or Counter-Trend — Don't Just Look at Pretty Local Setups
A lot of newcomers, the moment they see order blocks, FVG, or liquidity sweeps, jump straight to hunting entries, but the cheapest, easiest screen to run is: is this trade going with the big direction, or fighting it for a reversal guess? SMC's actual reading flow usually starts with the higher-timeframe lean, then moves down to liquidity, structure shift, and entry models. If you haven't even fixed direction, no matter how pretty the local setup, it can be just a small piece of noise inside the bigger trend. I'd look first at:
- On the higher timeframe, is it bullish, bearish, or just chopping in a range
- Is this pullback or bounce going with the original direction, or fighting it for a short-term play
- Does the current zone have liquidity and structural confirmation lining up at the same time.
Because counter-trend trades aren't off-limits — they're just less forgiving for newcomers, and stops get swept more easily. Separating trend-following from counter-trend first gives the chart shapes context, so you're not pulled around by every local signal.
Write Entry, Stop, and Invalidation Together — Don't Just Hunt Pretty Levels
The biggest SMC trap isn't failing to read the chart…

A lot of newcomers focus most on "where to enter," but whether you can actually take this trade has never been just about entry — it's about writing entry, stop, and invalidation together. SMC teachings also commonly define the entry zone first, then place the stop where structure or liquidity breaks, because a stop isn't just loss control — it also tells you when this trading idea is wrong. You can check with:
- Why am I entering here? Because structure, liquidity, order block, or FVG all line up — not just because the shape looks pretty.
- If wrong, where do I admit it? Place the stop where the trading logic fails — not at some random number.
- What conditions mean this trade is off? For example, key structure didn't hold, the breakout didn't stick, or price action looks completely different from what you expected. That way, before placing the trade, you know you're executing a plan — not figuring it out as you go.
A common mistake among newcomers isn't setting the wrong stop — it's only writing the entry and skipping the failure script. Once the market doesn't move as you expected, people without a defined invalidation point most commonly react by holding losing trades, moving stops, or stretching a short-term trade into long-term bag-holding. Compared with hunting for sharper entry points, I care much more about: if this trade is wrong, how do I exit small?
Validate With Small Positions, Backtests, and Trade Journals — Don't Just Burn Real Money
My first three months learning SMC, I didn't use a li…
SMC looks like "reading charts," but its discipline still has to come from rules, validation, and journaling. How you define structure, what counts as valid liquidity, what conditions actually permit entry — if each instance depends on current vibes, that isn't strategy, it's ad-hoc guessing. The purpose of backtesting is to put the rules back into historical moves: do the same entry/stop/invalidation conditions hold up across different market environments? Simulated or small-position live testing then verifies, without scaling losses, whether you can actually execute the rules. I'd recommend this validation order:
- Backtest first: Write the rules clearly first, then check them against a fixed sample — don't revise as you go.
- Then use a small position or paper trade: Watch whether you enter early, move stops, or override the plan the moment you see volatility.
- Finally, write a trade journal: At minimum, record entry reasoning, stop placement, invalidation condition, and exit reason — so when you review, you can tell whether the method had a problem or execution did. Trade journals exist to review trading habits, refine strategy, and reinforce discipline — not just track wins and losses.
A common mistake among newcomers isn't method selection — it's scaling up before validating. Especially SMC-style frameworks easily create the illusion of "I think I understand now," but the moment you're live, emotions, consecutive losses, and the urge to rewrite rules after a stop-out all show up together. Running the flow with a small position first, then deciding whether to add risk, looks much more like actual trading than paying tuition with a full account.
Common SMC Mistakes — Why Better Reading = More Losses
"Why are so many people who can already draw structure and mark order blocks no better at executing?" The issue usually isn't too few known terms — it's magnifying local signals too much, and pushing risk control too far back. This section breaks down the most common error modes directly.
Treating Every Liquidity Sweep as a Reversal Signal
A common newcomer misread: the moment price sweeps a prior high, prior low, or someone's stop, they label it as the start of a reversal. In reality, a liquidity sweep is closer to: the market goes to take a section of orders and stops that easily cluster. What follows can be a reversal — or just a continuation in the original direction. You can't conclude on "it got swept" alone. This kind of move can be either a reversal or a continuation — what matters is whether downstream structure actually changes.
A more grounded view: treat liquidity sweeps as a reminder to start observing, not a reminder to enter. At minimum, also check:
- What kind of level did it sweep: just noise highs/lows on a smaller timeframe, or a clearly significant liquidity zone on the higher timeframe.
- After the sweep, did structure confirm: e,g., character change or a key structural break — not just a long wick.
- Does the direction have context: is this a refill inside a continuing trend, or is the higher timeframe already approaching a possible turning zone.
What you should actually watch is whether, after the sweep, the market truly "can't hold back above" or "can't recover above." If it just sweeps and returns inside the original structure, that's likely just liquidity being taken — not the turn you wanted. If after the sweep structure also changed, and downstream you get an FVG, order block, or a failed retest, then it's closer to a structure you can actually trade. Sort this order out first, and you won't panic-call reversal on every high/low sweep.
Mistaking Complex Terminology for a High-Win-Rate Guarantee
When people first encounter SMC, they tend to get pulled in by a string of proper nouns — Order Block, FVG, CHoCH, MSS. The issue isn't whether to learn these terms — it's that more jargon easily makes people assume the method is more professional, therefore higher win rate. But technical analysis is about probabilities, not guarantees; even widely used technical indicators can't guarantee trading success alone — let alone SMC, which inherently has subjective room.
A common misread: "I can recognize these terms" mistaken for "I already have stable execution ability". A lot of newcomers go off the rails not because they're missing one more term, but because, after learning lots of terms, they can tell a story on every chart: this looks like an order block, that looks like liquidity, earlier it looks like CHoCH — eventually everything looks like an opportunity. You think you have more conviction, but actually you've just expanded the subjective room. Technical-analysis tools become valuable when they help you make better-grounded decisions paired with risk management — not when they replace risk control itself.
Terms are labels, not edges; consistent rules, controllable risk, are closer to actually executable trading. If you find yourself constantly adding terms, switching models, or chasing fancier chart annotations without writing entry, stop, and invalidation clearly — that usually isn't strategy upgrading; it's packaging uncertainty to look like conviction. For newcomers, before memorizing more vocabulary, the priority is confirming whether this reading flow can be repeated stably.
No Risk-Control Rules — Just Hunting the Prettiest Entry Spot
A lot of newcomers studying SMC get stuck not on chart-reading but on putting nearly all attention into "which entry looks most beautiful." But what actually decides whether you survive in trading usually isn't how precise the entry is — it's how you exit small if you're wrong. Public risk-control content also repeatedly emphasizes that stop-loss, position size, and risk-reward ratio are inherent parts of a trading plan; without these, no entry, however pretty, prevents emotions from taking over later.
SMC especially traps people here, because order blocks, FVG, and liquidity-sweep zones all look like "high-quality entry points." But if you haven't defined 3 things first, pretty levels usually just amplify risk:
- Max loss I'm willing to take on this trade: without position size and a risk cap, even small stops can hurt too much on a single trade.
- What conditions mean the trading logic is invalidated: place stops where structure fails — not at a random number.
- Is this trade worth taking: at minimum, check risk-reward first; otherwise you may take on a bad trade just to catch a pretty entry. This "define risk first, then talk about entry" approach is the core of a systematic trading plan.
I keep this fixed in mind: the entry is just the start, not the answer. If a trade has only entry reasoning, but no stop, no invalidation, no position rule, then what you're doing isn't a trading plan — it's betting the market moves exactly how you imagined. The real reason this kind of trade loses money usually isn't one missing technical term — it's simply never writing risk control into the trade.
SMC Limitations — Who Shouldn't Learn It Yet
"Have you considered: SMC isn't something every stage should learn first — and might even make some newcomers more confused?" This section makes SMC's limitations, subjectivity, and risk in high-leverage contexts clear — helping you decide whether to go deep now, or shore up the basics first.
The Same Chart Often Has Different Reads — Subjectivity Is Higher Than You Think
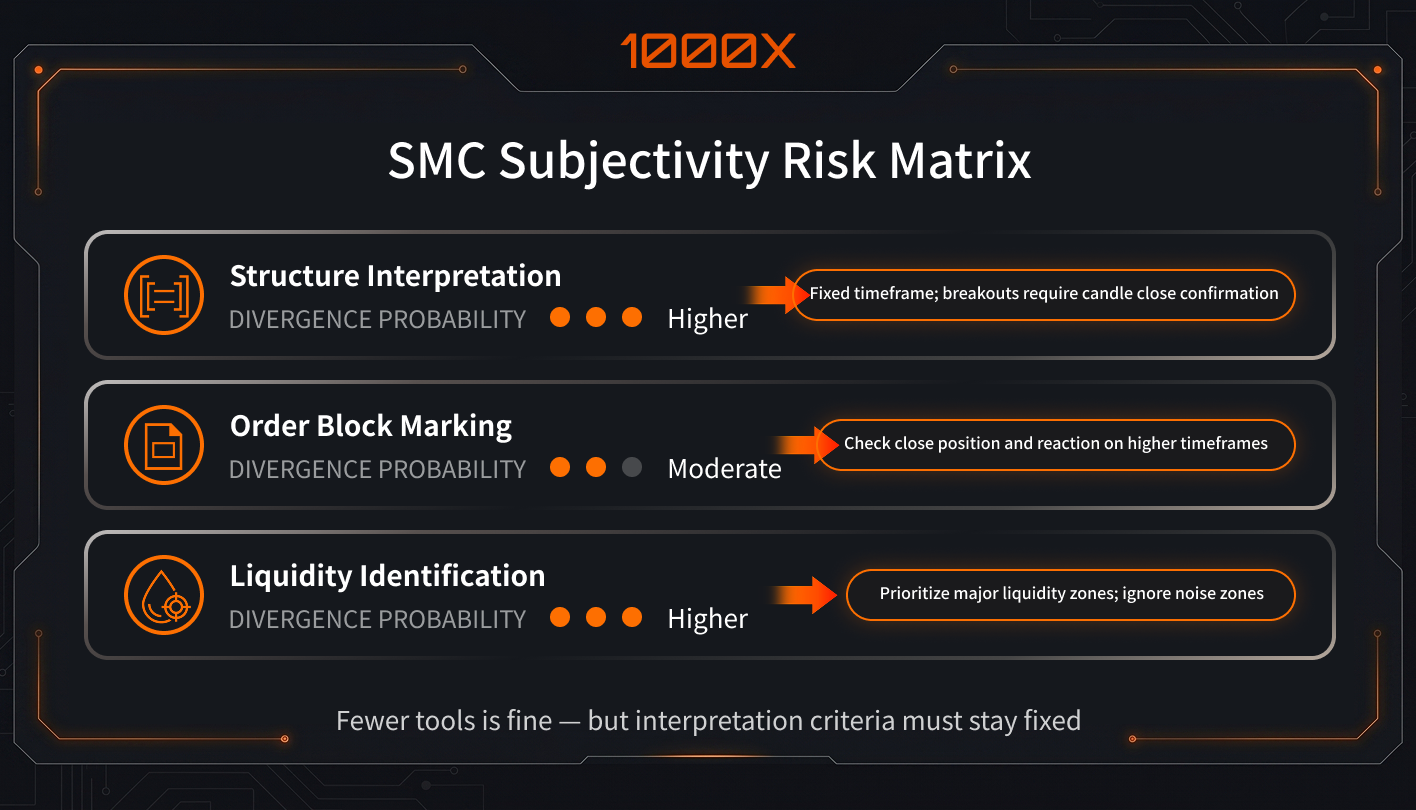
This is something newcomers most easily underestimate: on the same chart, different people genuinely can draw different structures, different liquidity zones — even mark order blocks and character changes at different spots. It isn't that one person definitely understands better — chart reading is inherently subjective. And chart patterns themselves are subjective reads. And SMC especially depends on how you choose swing high/swing low (swing highs/lows), how you define a valid break, and which zones count as key — so subjective room is usually larger than newcomers think.
The real trouble isn't that subjectivity exists — it's that without writing rules clearly, you can find a new reason every time you're wrong. This time, structure wasn't finished. Next time, liquidity wasn't fully taken. The time after that, the order block didn't fully react. A more practical approach: fix your own standards first — which timeframe defines structure, what counts as a valid break, which liquidity types you actually track. Rules must converge first, or the same chart's reading will keep changing. Otherwise the more you learn, the more reasons you have for any trade — not clarity.
That's why most SMC teachings eventually circle back to the same point: tools can be many, but reading standards must be fixed.
If You're Not Comfortable With Basic K-Lines and Risk Control, Learning SMC First Usually Makes Things Messier
SMC looks like a more advanced way of reading charts, but it didn't come from nowhere. Public teachings universally build SMC on price action, market structure, and liquidity — which means if your handle on what K-lines say, how trends continue, or where chop and noise live isn't stable yet, jumping straight to order blocks, FVG, or CHoCH usually just makes the chart look more complex, not your judgment clearer.
Another more-easily-overlooked thing: risk control. Technical analysis isn't a tool that guarantees results — it's a way to improve judgment probability. Without basic rules like risk-reward, stops, and position sizing, learning more SMC terms just stacks subjective reads thicker. For newcomers, a steadier order is usually: get K-lines, support/resistance, trend, and basic risk control solid first, then come back to SMC — so what you see is structure, not a pile of names that just makes you want to enter more often.
Newcomers most often ask me if they can learn SMC dir…
In High-Leverage Futures, What Gets Amplified Is Usually Errors, Not Edge
When you put SMC into high-leverage futures, the biggest issue isn't whether the method can be used — it's that the small errors in your read get amplified by leverage very fast. Exchanges' official educational materials keep reminding people that high leverage amplifies both gains and losses, and the higher the leverage, the smaller the tolerable price swing, and the higher the liquidation risk; for newcomers, that means your still-developing structure reads, liquidity understanding, and entry rhythm — once they're slightly off — can turn into significant losses, not just "wrong once."
SMC is especially prone to issues under high leverage because it's very dependent on structure reading and entry timing. Your direction may be roughly right, but entering too early, placing the stop too close, or mistaking a liquidity sweep for a reversal — those errors that are small in low leverage can quickly hit liquidation or forced stops in high leverage. Official content also reminds people directly: newcomers should be more careful with leverage choice, and pair it with risk-control tools like stops, because high leverage itself raises liquidation risk.
So if you really want to use SMC in futures, I'd put the emphasis on low leverage, fixed risk, and a clear invalidation condition first — not on chasing the prettiest entry. High leverage doesn't automatically magnify edge; what it more often magnifies is your unfixed reading errors, execution slips, and emotional reactions. For newcomers, getting the method to run smoothly first matters more than scaling up leverage.
Conclusion
What this article wants to convey isn't about memorizing more SMC terms — it's helping you skip detours where you'd burn real money to learn. Market structure, liquidity, order blocks, FVG — the hard part has never been the jargon itself. It's whether, before entering, you can see direction clearly, keep risk control intact, and know which signals you shouldn't rush to call opportunities. If you'd rather not be alone with the chart, doubting yourself over and over, having read a lot but still unsure where you misread — you're welcome to join us. This isn't just sharing concepts; it's people who'll break down charts with you and calibrate blind spots, so what you take in slowly becomes ability you can actually use.


